SFTP Send
SFTP Send
Installation
Download the appropriate version of the application from SourceForge[1]
- Note that the Windows and MacOS version of the application come with their own private Java Runtime bundled as part of the installer. The Linux version of the installer does not have Java included with it and you will need to make sure that you have Java 1.8 or higher available on your machine.
There is no Graphical User Interface (GUI) for this utility. It can be run from the command prompt / terminal or as a background process.
Before running the application you need to configure it by editing 2 xml files which can be found in the xml/config 'subdirectory.
The two files of interest are sftpSend.xml and email.xml. You only need to edit email.xml if you want the application to send you notifications when files are transferred.
Example 1 (User Password Authentication)
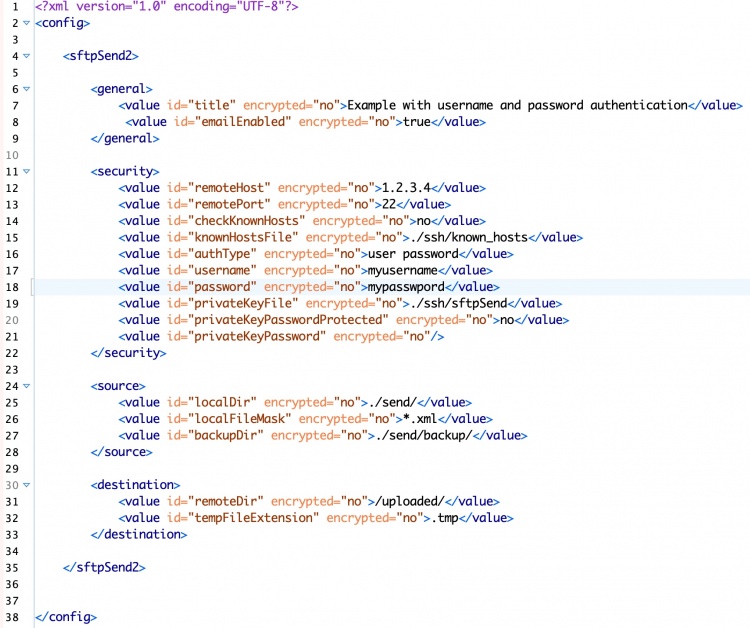
The example above shows some values for a configuration that would be used to upload files of type *.xml to a remote SFTP server with username and password authentication.
Line 7 title is a simple heading and is used both for simple documentation and is also used by the email module as the subject for any emails sent.
Line 8 emailEnabled is a simple "true" or "false" switch which either enables or disables the sending of emails by the SFTP Send application.
Line 12 remoteHost is the name of IP Address of the remote host. Note that you can encrypt this information if you want using the SFTP Send Encrypt Utility
Line 13 remotePort is the port number to use for the SFTP connection
Line 14 checkKnownHosts is a yes or no switch to determine if the application validates the connection using the known_hosts file.
Line 15 knownHostsFile is the location of the "known_hosts" file to use.
Line 16 authType can have two possible values "user password" or "user public key"
Line 17 username can be used with both types of authentication.
Line 18 password only used for "user password" authentication
Line 19 privateKeyFile contains the location of the private key file that you want to use. An example linux command line for creating a key pair would be ssh-keygen -m pem -f $1 where $1 should be the filename that you want to create
Line 20 privateKeyPasswordProtected is a "yes" or "no" question
Line 21 privateKeyPassword if you password protected the private key then this entry will store that password.
Line 25 localDir contains the path to where you intend to place files for uploading. You should end the path with the appropriate path separator for your operating system "/" or "\"
Line 26 localFileMask is a wildcard mask to allow the program filter those files which are identified for upload. You could for example use "*.xml" or "UPL?????.xml"
Line 27 backupDir if you wish to keep a local backup copy of files before they are uploaded to the remote server then you can specify where this backup folder is using this setting.
Line 31 remoteDir is the path (folder/directory) on the remote server where you want files saved.
Line 32 tempFileExtension if the remote system is processing files as they arrive you can specify a temporary file extension so that the file won't be recognised and processed until it's finished uploading. This assumes that the remote process is also using a wildcard to identify files to process.
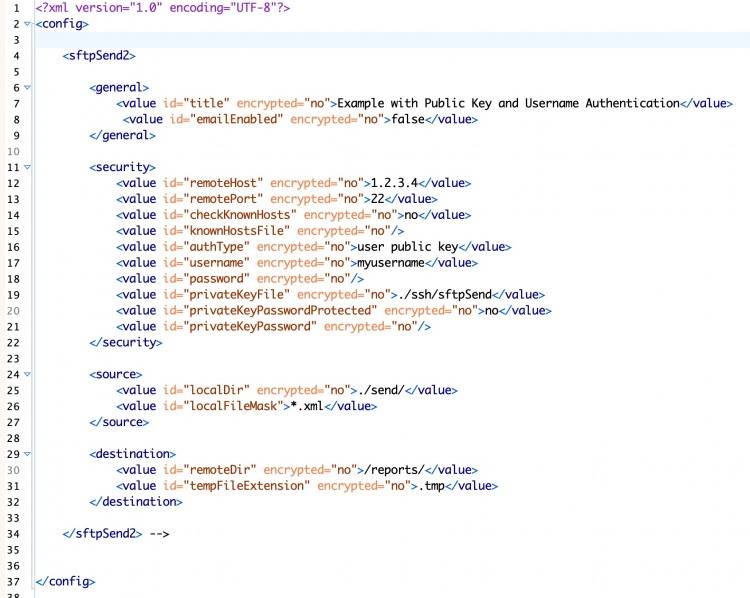
Example 2 (Public Key)
Line 16 authType

